(⚠️Formatting still a work in progress⚠️)
How do I make 3d models?
People asked me this so I wanted to give a little idea of my workflow and maybe give tips as much as I can.
It's probably better to follow a video tutorial but hopefully this little document is helpful too.
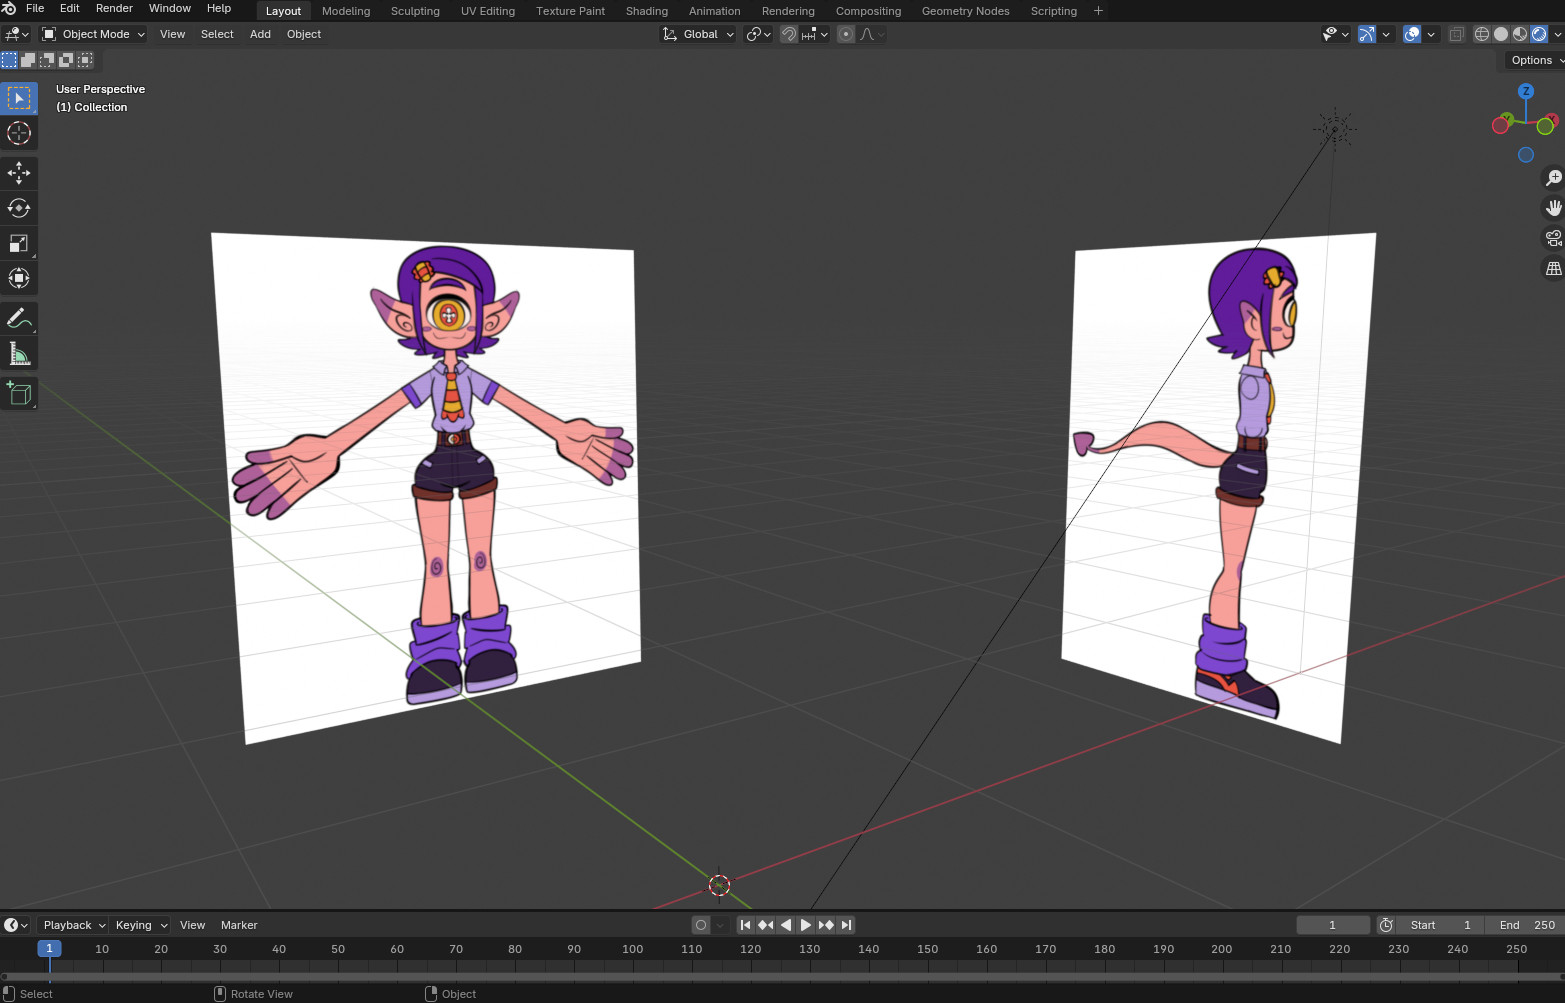
Before I start a model I usually make a very rough sketch reference in two angles that I can follow, it doesn't need to be perfect, I don't even color them sometimes.
The reason I use this A-pose mostly is because the add-on I use to rig the model works better with it, but it doesn’t matter that much.
Blender version I use currently: 4.2.3 LTS
The screenshots will be based on this version so if something doesn’t line up for you it’s probably a different one.
First I import the image in Blender as a flat plane in this configuration so I can follow it closely as reference.
If you’re using the basic viewport shading you need to change this setting so it lets you see the image you want to import, or you can use the other shading modes.
How to import the image?
Press Shift + A or select Add in the top menu, Image -> Mesh Plane
I like to change the Shader option to “Shadeless” when selecting the image, and check Backface Culling so the back of the image is transparent.
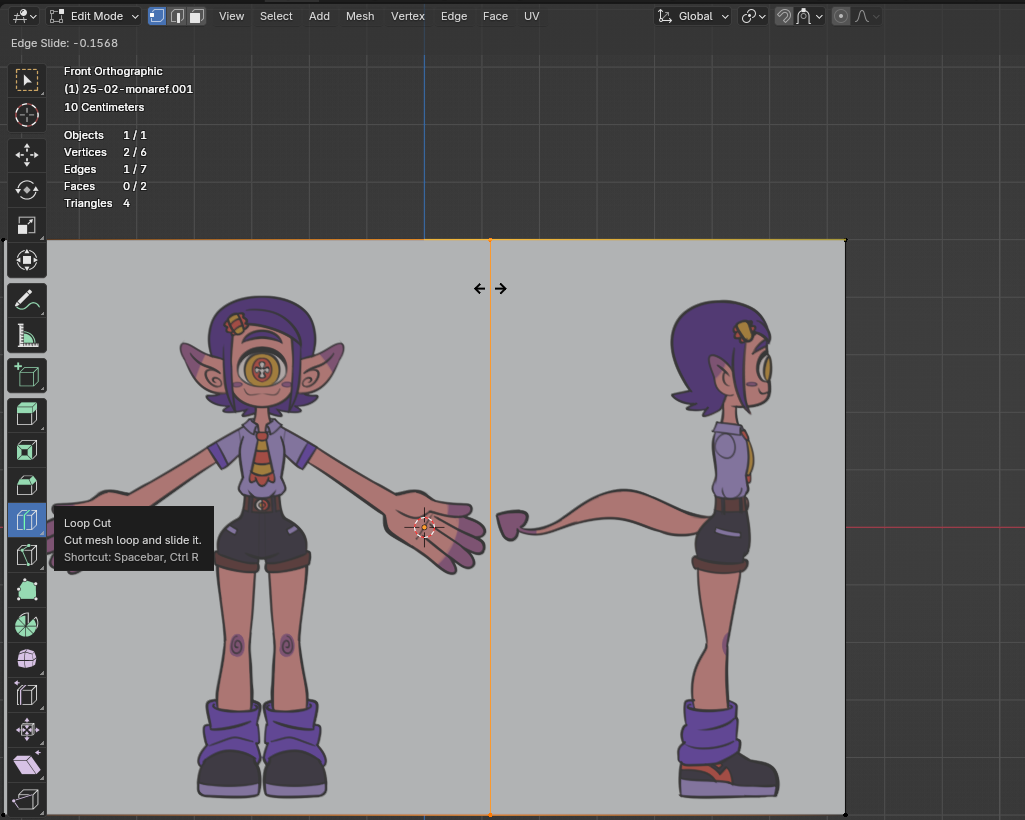
In edit mode, I make a Loop-cut to separate the two angles into two pieces which I can move a comfortable distance away from the middle of the scene.
To do this I select the four vertices that contain the side-angle, then change the pivot point to Active, if I select one of the vertices in the middle first the rotation will be done from that point, so I just do a -90 rotation in the Z-axis.
Now you can split this part, pressing Y or in this menu.
Starting out
Once the reference is set, I start modeling using a basic cube with a subdivision modifier to make it rounder. I call this part the “Sketch” version of the model.
You can use other shapes as well, they’ll end up looking different using this modifier, and the more “cuts” you make the more polygons the result will have.
Here’s some things to consider first:
Try to think about these things before going fully into making something, sometimes having a specific goal will make it easier to focus and not get distracted with other ideas in the moment.
What’s the target aesthetic of the model?
Aesthetics is something I consider first, I like my models to have under 5 thousand polygons if possible, which makes them look around the sixth generation of console graphics. Of course I take liberties with things like shaders and modifiers in blender. The main thing I enjoy about making 3d models is emulating different eras of video game history with the characters I’ve created, so I don’t usually model high definition realistic things and instead go for more stylized designs.
- Polygon count
Here’s some ideas of the polygon target for each distinct era or console generation I like to reference:
200-800 polygons - Nintendo 64/PS1 era models
100-700 polygons - Nintendo DS models
1500-4500 polygons - Gamecube/PS2/Original Xbox era models
3000-5000 polygons - Nintendo 3DS models
4000-8000 polygons - Wii models
Around 8000 polygons - PS3/Xbox 360/Nintendo Switch models
Over 12,000 polygons - PS4/Xbox One models
Anything else is modern consoles and PC, most triple A games have models with over 60k triangles, which is a little excessive if you ask me, but they get away with this by making different “Level of Detail” models.
- Textures
The textures for the model are just as important as the mesh, a lot of detail can be packed into a couple images, and the resolution of them can make or break the aesthetic you want to go for. For my models I tend to use 512 x 512 pixels or 1024 x 1024 pixels if there’s enough details needed, and I like to use a separate texture in full resolution for important features like the eyes or the mouth if it’s gonna be a sticker instead of modeled. In blender a model’s “materials” usually contain the textures, these can be more than just the basic colors, like a texture that contains details about how shiny a piece of the model will be, or a mask texture to make some parts of the model transparent.
- Shaders
This part is a little more complicated, but shaders are basically a bunch of instructions that we give to the graphics engine so it can give us a nice rendered image of our model. I like to mess a bit with the shaders in my model’s materials so they have a certain style to them, you can for example make them look cel-shaded or have moving textures using shaders. In blender all materials use “nodes” that can be moved and combined to create different effects directly onto the model in combination with the textures.
Modeling progress
Now, I can’t really guide people on how to model their own character from scratch, but I can give some tips and resources.
First of all, the “sketch” doesn’t need to be perfect, and this method isn’t the only one. A lot of people like to use ‘Sculpting’ tools to make models as if they were playing with clay.
But the benefit of making sketches like me, at least when making lower polygon models, is that the end result isn’t too polygon-heavy and can be used as a base for the final model.
I want to show the sketch model I made for this project, it looks very rough at this stage, but I didn’t model it using this view, instead I referenced what I could see with the modifier turned on.
Notice how the modifier is set to only the first level of subdivisions, this is so the result isn’t too smoothed out and loses the shapes I’m working with.
Sketch model
Here’s how this should look when the modifier is turned on:
At this point I only bothered to model the right hand and leg, since they’re symmetric I can just mirror them later. Another detail I omitted is the face, if this was an n64 model I’d just use a texture for it, but I want the eye to have a bit of depth, so I’ll model it when I move on from the sketch.
This is the best time to see if the proportions are right, if something looks off I just tweak it here until it’s just how I want it, and then I can move on to working on the main model.
The Main model
Some people like to apply the subdivision modifier on the sketch and start editing it directly, if you want to do this you should probably make a copy of it first in case something doesn’t look right later or you make a big mistake.
In my case I like to do a retopology of the sketch, to add onto it all the details I want and have more control of how many polygons the end result will have, it also helps to remove seams where the body parts don’t connect, if that’s something you don’t want.
In my model I want the arms to be separated from the main body, but the legs, neck and head will be joined to it seamlessly.
Retopology
Here's some better guides to get you started into retopology, this process is very useful if you sculped a model with very high polygon count, in this model I'm only doing it because I want to make sure the eyeball is modeled according to the head shape, which helps when I want to do facial expressions.
The first thing I do is add a “Plane”, a simple rectangle with no textures, and I position it in front of the head of my sketch.
Here I set the sketch to have flat faces so it’s easier to see the individual polygons, just right click and select Shade Flat on the object.
Now to start the Retopology process I want to extrude faces and make it so they automatically snap to the sketch, as well as look transparent enough that I can still see the model under them, to do this there’s a few steps.
Re-topology set up
First of all, click the magnet icon on top, this will activate auto-snap mode, you click the icon next to it to see more options, the one I like to use is the Face Nearest option, since it’s more consistent than the Face project one, but you can experiment and see what works better for you.
To make the geometry semi-solid and easy to distinguish from the sketch you click the square icon with four dots that’s on the image, this will let you activate the Retopology shading profile, which will make it so the object you’re editing has a blue tint to it and is see-through.
Lastly you can also add a mirror modifier if your model is symmetric, that way you just need to model one side, just make sure the middle point or “Origin” of the model is in the right place, the little orange dot should be it.
There’s probably tons of tutorials for this process that can explain it in detail, the main thing I want to show is that you can build on top of your sketch just like how you can ink a drawing on top of a pencil sketch.
After retopology is done, the result now has a modeled eyeball, I added accessories, extra clothing details, the hands are now a single mesh connected to the arms, but I still left some details out that I think will work better as textures for the aesthetic I’m going for, like the mouth.
I loosely followed the shape of the sketch, making sure there’s some extra vertices in the elbows, knees, fingers and other parts that would bend. The only part that isn’t mirrored is the tuft of hair and the hair clip at the front of her face, so I made a separate piece without the mirror modifier on it.
Here's a video that I used as reference for making the knees and elbows, even if the character here is supposed to be more cartoony and boneless it helps to give some extra polygons at the joints so they can stretch better, of course if you subdivide them more the bend will be smoother, but it can break the aesthetic in models made to be more retro looking.
The red edges here are guidelines for the “UV” maps, these maps are how textures are applied to the model, think of it like cut-out lines from a paper craft model, I like to make them along the model, but sometimes I need to remake some if they don’t look right when I “unwrap” them onto a 2d image.
This video is incredibly useful and well explained that teaches about UVs, I will go into a bit of detail about how I do my UV maps and textures but I'd recommend looking into this person's guides first, or after reading my ramblings, whatever works better.
The final polygon count for this model was around 4 thousand, all clothing accessories included, sometimes I need to make extra cuts if the rigging needs it, but it lines up with the range I set out to do.
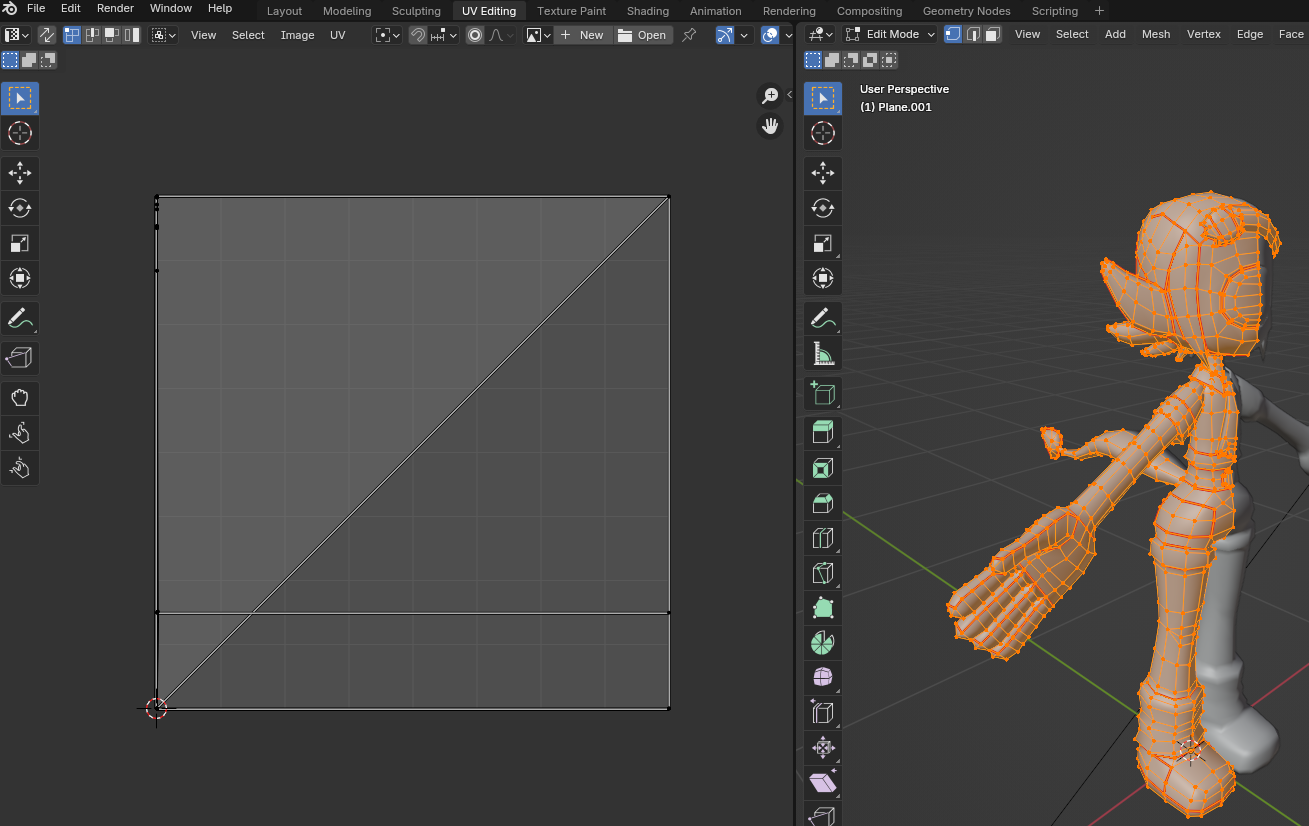
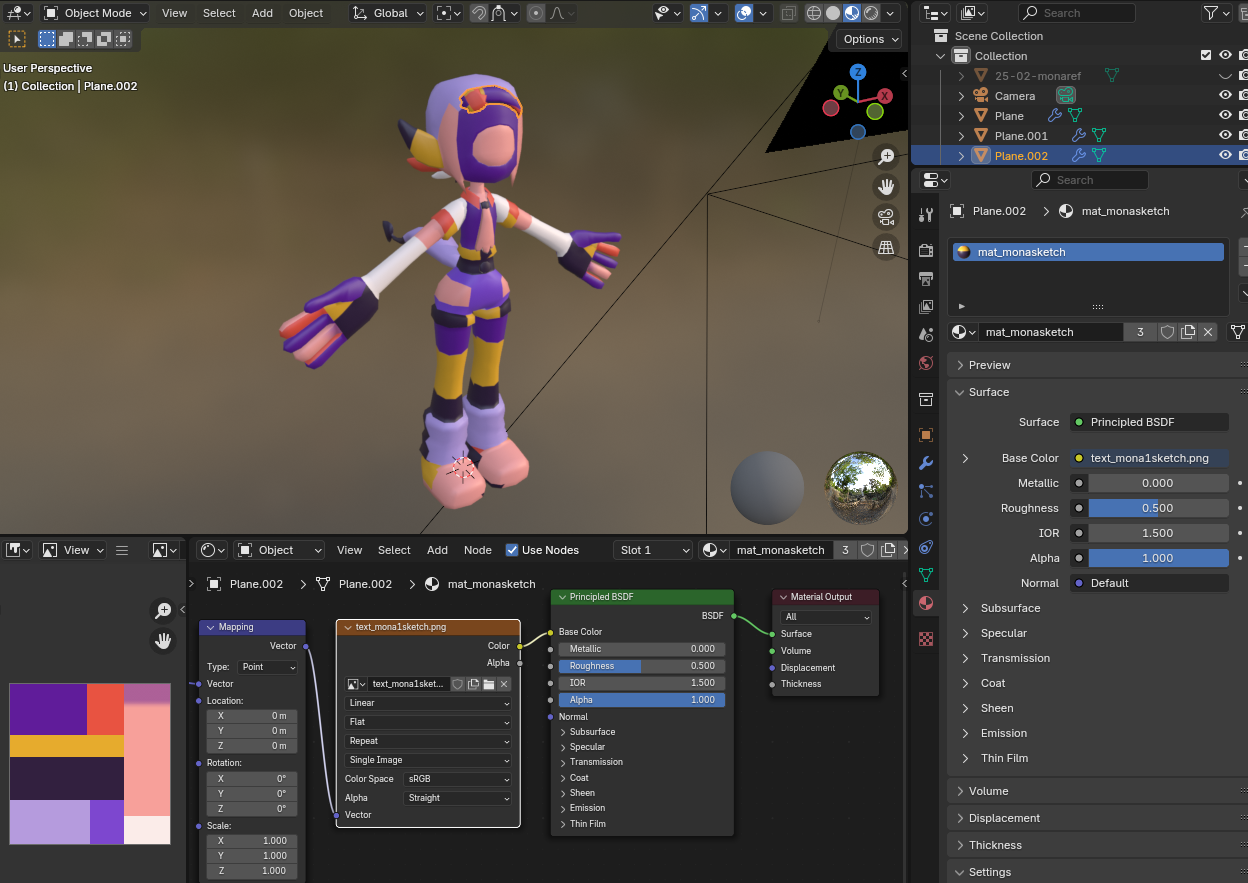
Now, how do we start making textures? The first step is to make the UV maps unwrap onto a 2d plane, in Blender there’s a UV Editing Tab at the top. I selected the objects from the final model and in edit mode I pressed “A” to select all the vertices, this looks weird at first but it’s because it’s using the UV maps of the Plane I created at first.
If I click on Unwrap it’ll neatly organize all the pieces I separated using the edge seams.
To mark the edge seams you need to click at least two connected vertices and then in the Edge option on the top menu there’s a “Mark Seam” option.
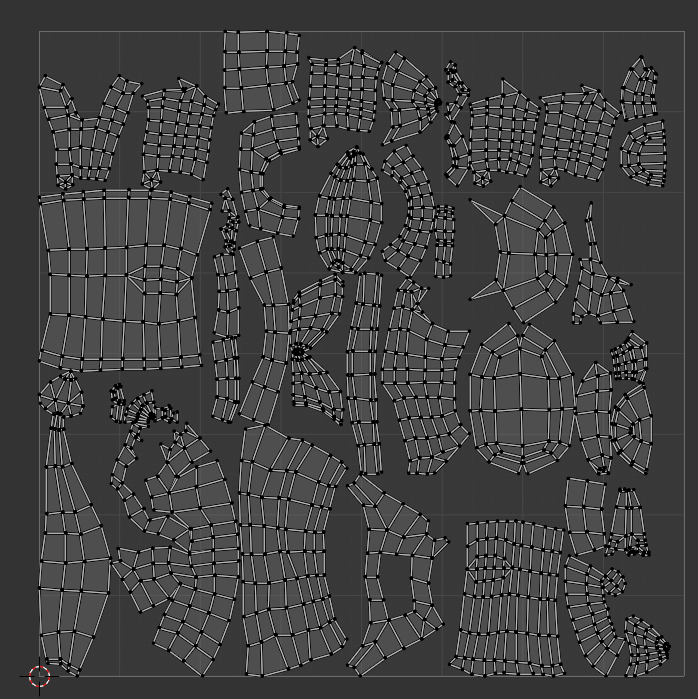
Here’s how the UV map ended up looking:
At this point it’s hard to tell what piece is what, so to organize them I like to make a basic texture with the main colors of the character.
I set up the material first, creating a new one.
We give it a texture to use for the material.
It’ll look weird at first but now I can start organizing the UVs.
As you can see, now if I move the UVs, the texture on the model will change. I usually move all of them into one color, then select the pieces I need, and put them on top of the color they should be.
And here’s how that looks like:
A little idea I implemented in this particular model was to make the eye borders a different color, so it looks like the eyelash lines. Once I have an eye texture done I can tweak it so it looks more like the reference.
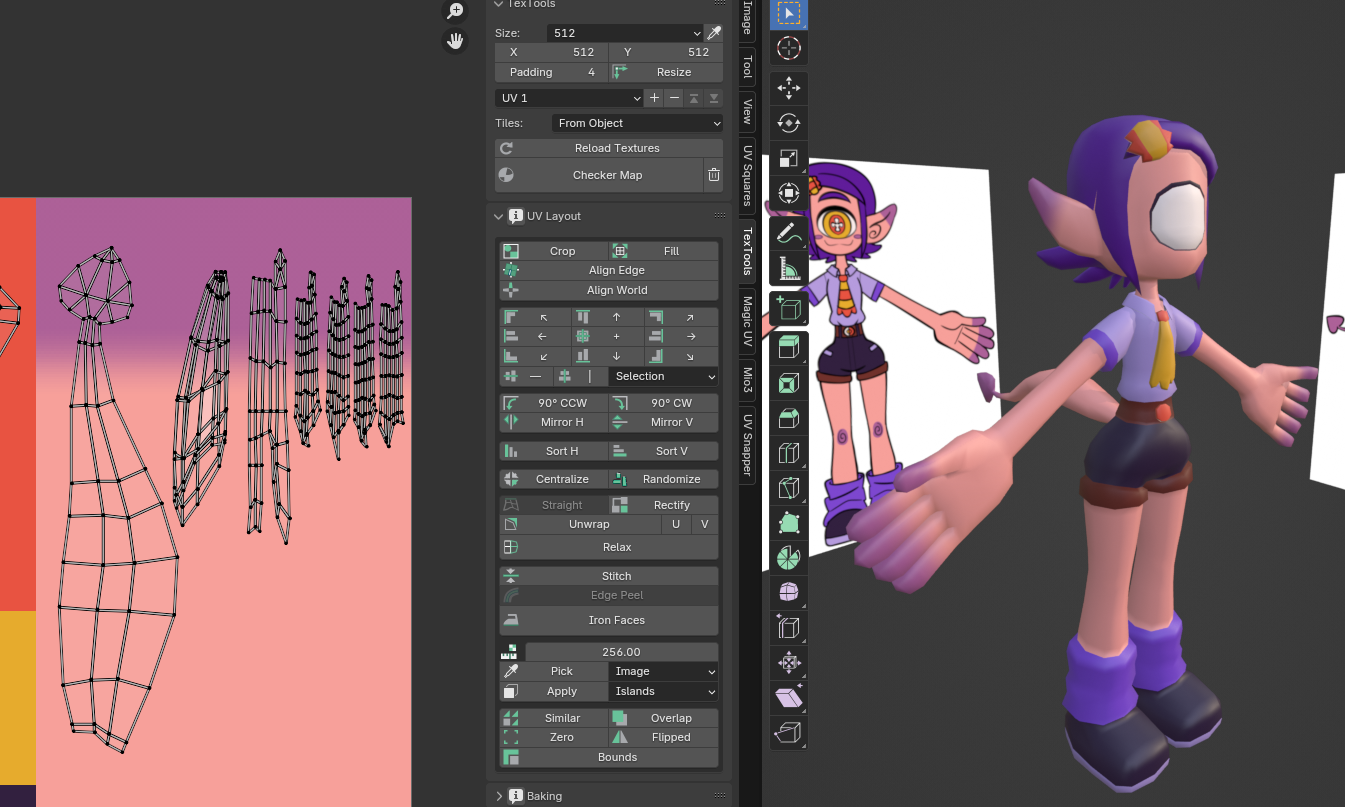
Another idea I had for the gradient in some parts of the skin was to do this:
I took the UV pieces that I wanted to have a gradient and stretched them along the gradient in the texture. This is very messy but I’m going to bake these textures into more neatly organized UVs on a higher resolution, so I can paint over them more easily.
I usually delete the old UVs and work with the baked ones, you can find them on the Data tab on the side bar.
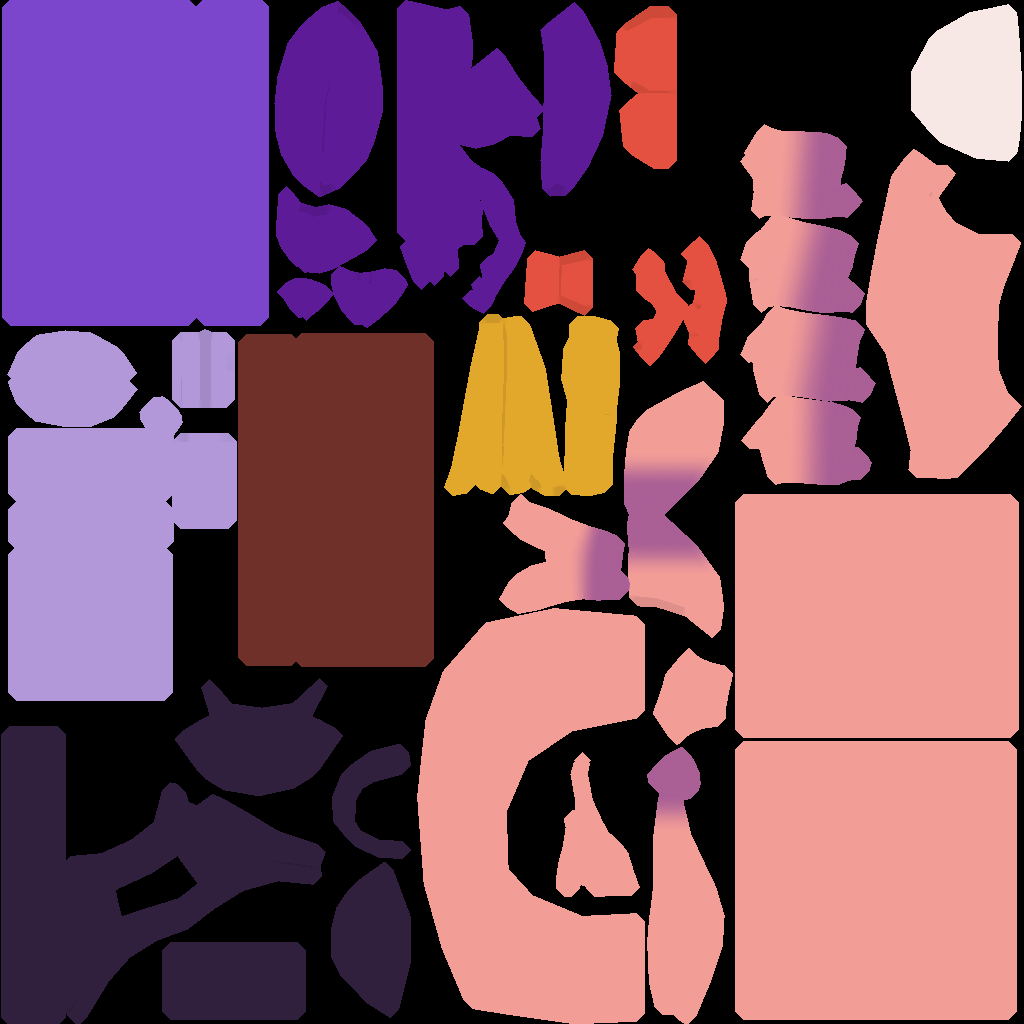
The specifics for baking are too much for this little document, but these are the settings I use, it’s just to get a texture, but it has other uses if you want to add extra texture details.
Once this is done I have this nice 1024 x 1024 pixels texture that I can edit as I’d like.
You can paint textures directly on Blender, but the tools are a bit weird so I like to do simple edits and clean them up with Clip Studio later if I need to.
Here’s the quick edit in Blender, doesn’t look too bad.
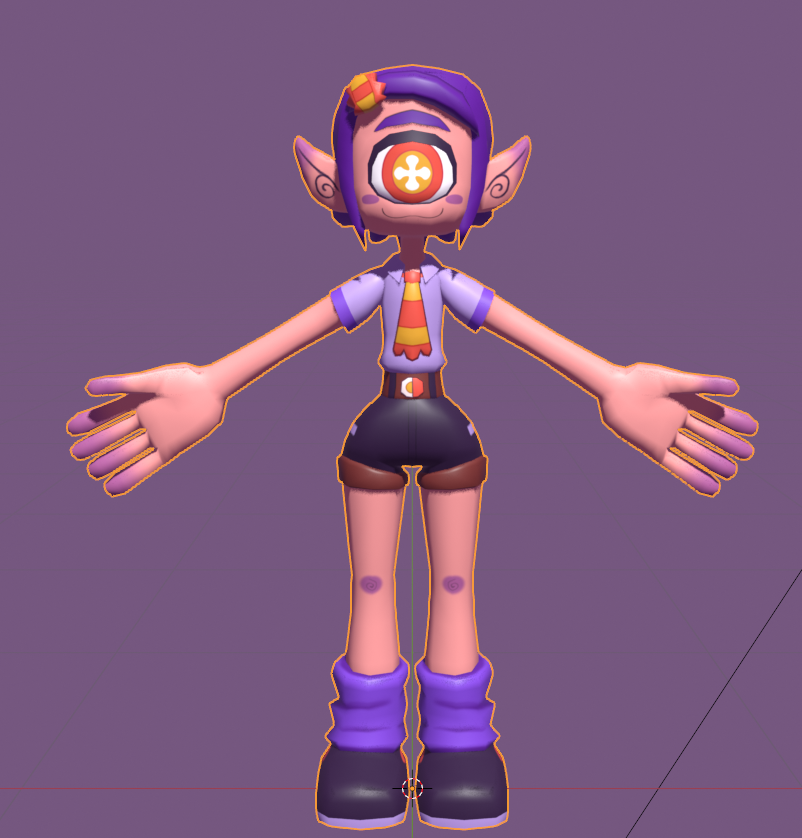
And the model is finally done! I edited the textures and tweaked some things, then I made a separate material for the eye, mouth and eyebrow, so I can animate them easier later.
Rigging
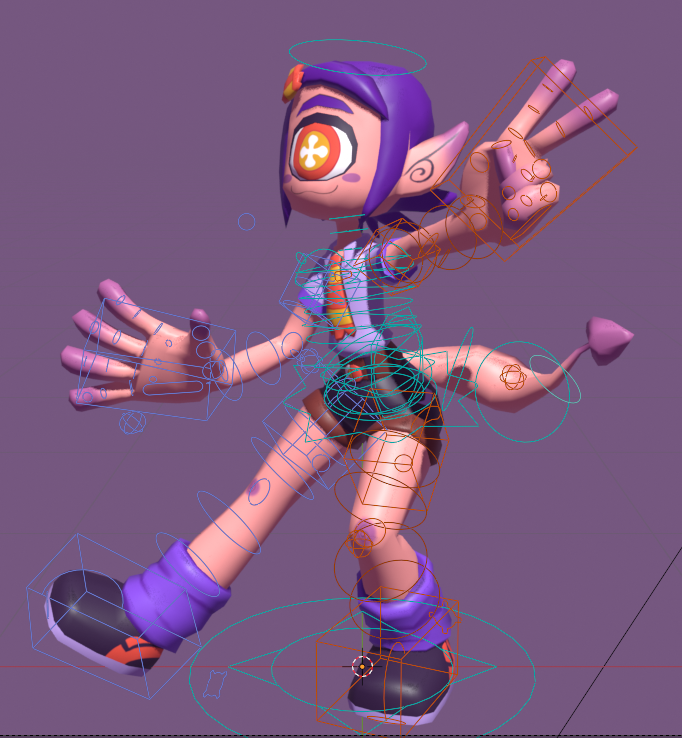
The process of rigging to me depends on what I want the model to do, for this one in particular I just want it to have a regular body rig with a way to control the eye, eyebrow and mouth texture.
There’s different tools to rig a character automatically, or to make it much simpler. I use a version of Auto Rig Pro , an add-on that works great but is paid only. For a free option there’s Rigify , which isn’t bad but needs a lot of fine tuning. Finally I have also used Mixamo , it’s pretty annoying to have to register to use it, but it’s not a bad free option.
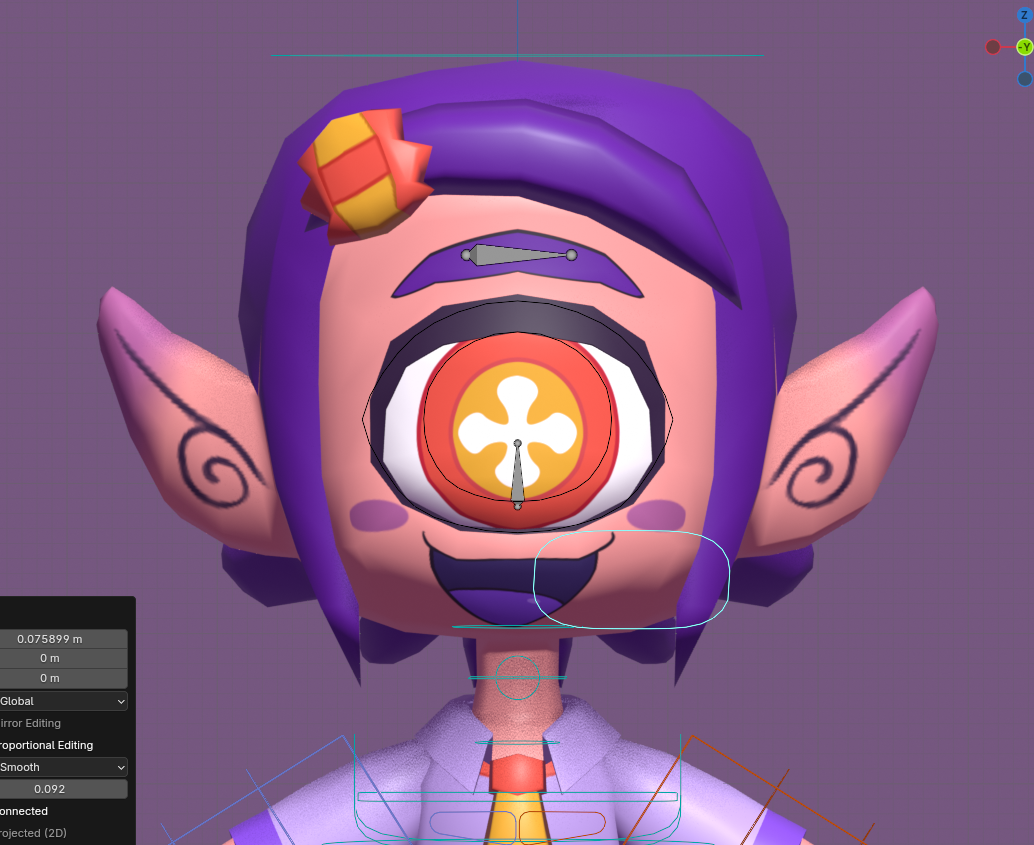
Once I have the rigged skeleton, I like to add some bones to control the eyes and other things I need, this I can give some info about.
Making the eye texture move with a bone
First I make a bone and put it relatively close to the face, it will be parented to the bone that controls the head, so it’s easier to use.
Then I go to the material of the eyeball and add two Value nodes:
Using a combine XYZ node I connect them to the texture’s location:
I like to name them with a label too
Now in pose mode I select the bone I created, and on the sidebar (hotkey should be ‘N’) I like to use the Location in the X axis for it to move the eye right and left:
To do this, I’m gonna use ‘Drivers’, they’re a bit of scripting within blender but nothing super complicated.
Right clicking on the X location I select the “Copy as new driver” option:
Then I go to the material nodes and paste the driver on the input value:
This will work, but I like to edit it a little first so it’s easier to use:
First I changed the Type setting to Scripted Expression:
I changed the expression to -location, in this case location is the name of the variable just below, it just tracks where in the X axis the bone is, but it’s doing it inverted, so the minus is just a fix for that. Depending on the scale of your model, it might be good to divide this value using the / symbol so it’s easier to use.
Now the eye texture can move just by moving the bone, you can do the same with the Y axis.
For the mouth I use a similar setup, just changing a texture depending on what X location value the mouth bone has.
I first learned to do this following this tutorial, it’s really helped me do these kinds of things easier.
The last thing I did to this model was set up the shader, using the material nodes which are honestly very useful for so many things I like to do.
This is the main material for the body, the box with the green top is a group I made, where all the nodes that create the shader are inside.
The main thing this shader does is give a bit of a more cartoony lighting, I put a little border shine to the body and made the shadows a little more sharp.
Here’s how the nodes in the group look:
I’m gonna explain it bit by bit, first the green top box called Principled BSDF:
This is the shading of the model, isolated from the texture, the settings here are for things like roughness, which is how shiny the material is, lowering it will make it look more balloon-like, and increasing it will make the shine less noticeable.
The specular is also important, it’ll control the transparency of the shine, using textures I could control these two settings to add or decrease the shine in specific parts of the model.
The Shader to RGB node takes this info and turns it into color data, so you can edit it in real time, this setting only works in the ‘Eevee’ render engine, if I used ‘Cycles’ it wouldn’t work.
Following that node I direct this color data into two directions, first it’s a ‘Map range’ node, which is basically what does the Cel-shading effect, it’s a bit hard to explain but it’s making the darker parts darker and the lighter parts lighter, so instead of a soft transition from white to shade there’s a bit of a sharper edge.
This would be good enough for the effect, but the map range turns all color into grayscale, so to give back some of the color I use a ‘Mix color’ node and set it to Add instead of Mix, then I connect the grayscale cel-shading to the A entry, and the raw shader to rgb data to the B entry, this will add the color to the grayscale shading, and make it look nicer.
Now to do the border light, I use an Input node called ‘Layer Weight’, it will do just what I want, but needs a little tuning in the ‘Blend’ setting.
After this, I use a map range again to make the dark parts just a little darker, then I connect this data as the ‘Factor’ of another Mix color node. I set this from Mix to Add as well, and connect the model’s main texture to it in the A slot, and the color I want the shine to have, for example if I put blue in this slot it’s going to look like this:
Now I just join these two parts using a Mix node set as Multiply, with the border shine on slot A, and the shading on slot B.
The last bit is for the textures with transparency like the eyebrow and the mouth, the Mix shader node uses the Alpha of the texture as Factor, the Transparent BSDF is to add transparency, and on the bottom is the node with everything mixed in with the texture.
And now it’s basically done, it’s a pretty simple set up and there’s many ways to do it so I’m always experimenting with the nodes.
This is how the model looks without shaders:
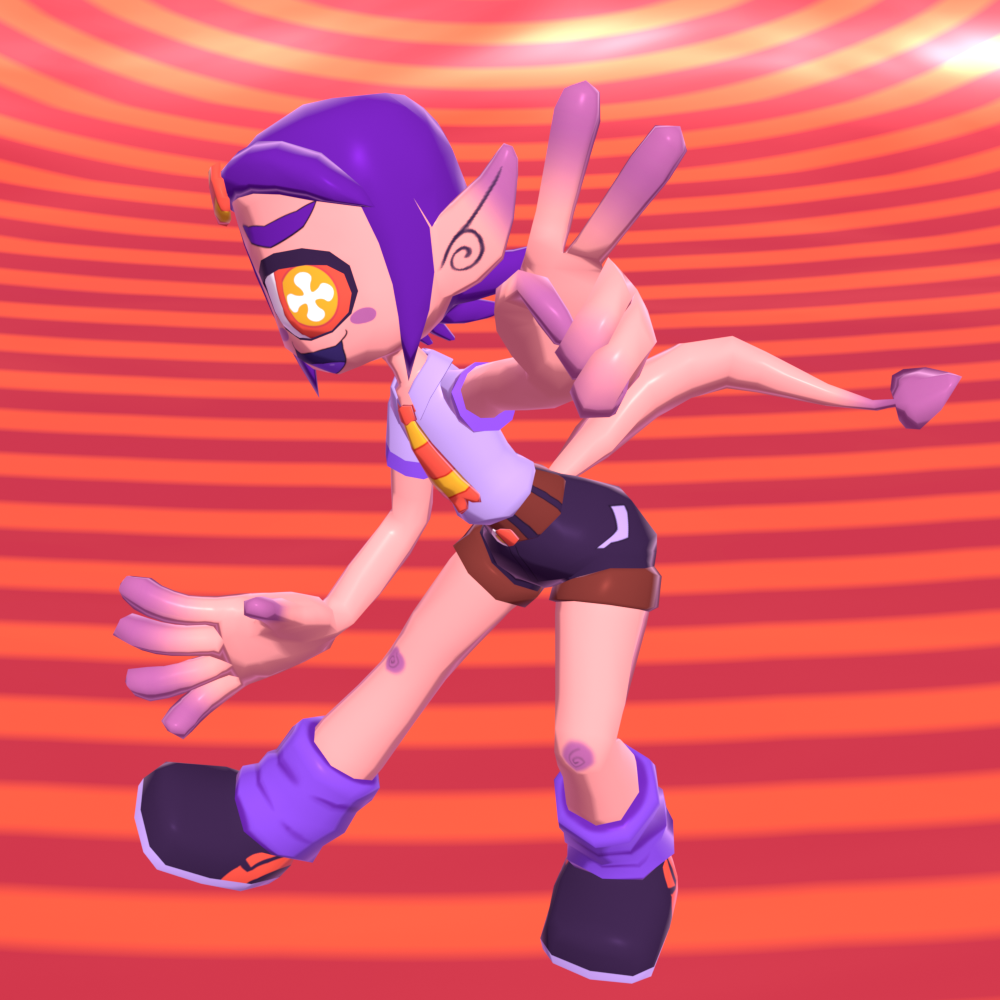
And the final render with shaders:
Of course which one looks better is up to preference, the advantage of using shaders to me is that I can control the colors more easily without using multiple light sources.


